WEB MATERIAL
WEB MATERIAL
A. Web ApplicationIn software engineering, a web application (a web application or webappis often abbreviated) is an application that is accessed using a web browser (web browser) via a network such as the Internet or an intranet.
B. what is the INTERNET?
The Internet is a network of computers connected in a global (worldwide) using TCP/IP as the Protocol of exchange of data packets.
C. what is the WEBSITE
The Website is a collection of web pages, which are encapsulated in a domain name (website address), which is on the WWW (World Wide Web) on the Internet.
D. Static Web
Static Web is static web pages don't change content and layout with every request unless a programmer to manually update the page. Simple HTML page is an example of static content.
E. Dynamic Web
Dynamic Web is dynamic web pages adapt their content or display depending on the input end-user interaction or changes in the computing environment of the user, time, database modifications, etc.
F. Dynamic Content
Dynamic content is often compiled on the server using server-side scripting language such as Perl, PHP, ASP, JSP, ColdFusion, etc. Two approaches are commonly used in complex applications.
What is PHP?
-PHP is PHP Hypertext Preprocessor
-PHP is a server-side scripting language, such as ASP
PHP scripts are run on the server
-PHP supports many databases (MySQL, Informix, Oracle, Sybase, Solid, PostgreSQL, Generic ODBC, etc.)
-PHP is open source software
-PHP is free to download and use
-PHP used for programming dynamic web sites. PHP can be used to build a CMS (Conten Management System)
-PHP File can contain text, HTML tags and scripts
-PHP file is returned to the browser as plain HTML
-PHP files have a file extension of ".php"
G. Why PHP?
PHP runs on different platforms (Windows, Linux, Unix, etc.)
PHP is compatible with almost all servers used today (Apache, IIS, etc.)
PHP is FREE to download from the official PHP resource: www.php.netPHP is easy to learn and it runs efficiently on the server side
H. To Start
Install Apache (or IIS), PHP, and MySQL installed or it could be by simply installing XAMPP which has all the built-in software.
 WordPress Install offline as a CMS (Content Management System)
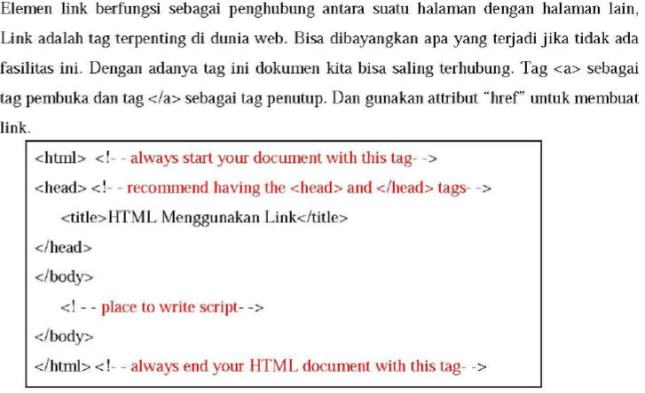
I. HTML
Hypertext Markup Language is the standard language used to display the document web, you can do it with HTML, namely: Control display of the web page and contentnya. Publish a document online so it can be accessed from all over the world. Create online forms that can be used to handle registration, transactions online. Adding object-object like image, video and audi, also java applet in an HTML document.
J. Browser and Editor
Browser
A Browser is software is installed on the client machine that serves to translate HTML tags into a web page.Browsers are often in use usually Internet Explorer, Netscape Navigator and many others.
Editor
A Program that is used to create document HTML, there are a lot of HTML editor that you can use include: Ms FrontPage, Dreamweaver, Notepad ++.
K. TAG-AN HTML TAG
The Command is usually called tags, HTML TAG used to define the display of the document HTML.
< </end > tags begin tag >
Example: Every HTML document at the start and at the end with HTML tags.
<html>
. . .
</html>
Tags are not case sensitive, so you can use the <HTML> or <html> they both produce the same output.
Form of HTML tags as follows:
< element > attribute = value
Element : name
tag Attribute:
the attributes of the tag
Value : the value of
attribute. Example:
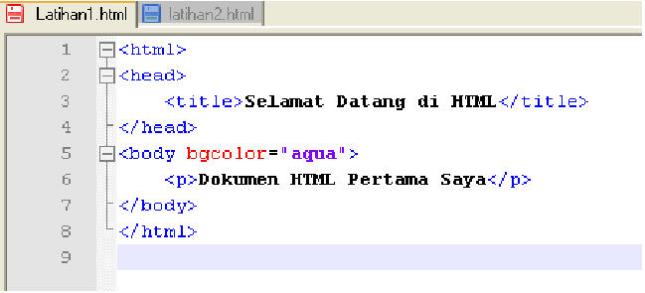
< body bgcolor = red >
body is the element, bgcolor(Background) is an attribute that has the value red.
B.HTML DOCUMENT STRUCTURE
An HTML Document can be to become the three main parts:
1. HTML
Every HTML document must be at the start and at the close with <html></html> HTML tags HTML tags tell browsers that are in both the tag is an HTML document.
2. HEAD
The header section of the HTML document in the flank by the tag <head></head> in this section usually contains the TITLE tag that displays the title of the page in the browser titlenya. In addition megunakan also Bookmark TITLE tags to give mark a web site. The Browser stores the "title" as a bookmark and also for the purposes of the search (searching) is usually used as a title keyword. The Header also contains the META tag that is usually used to determine specific information about the HTML document, you can specify the author name, keywords, and lainyan in the META tag. Example:
< META name = "Author" contents = "Mountain Boy" >
Author of the document is "Mountain Boy"
The http-equiv attribute can be the name of gunkan to put HTTP Server attributes for creating HTTP headers.
Example:
< META http-equiv = "Expires" content = "Wed, 7 May 2003 20: 30: 40 GMT" >
that will create a HTTP header:
Expires: Wed, 7 May 2003 20: 30: 40 GMT
So if the docs in cached, HTTP megetahui when to mengapdate document in the cache.
M. BODY
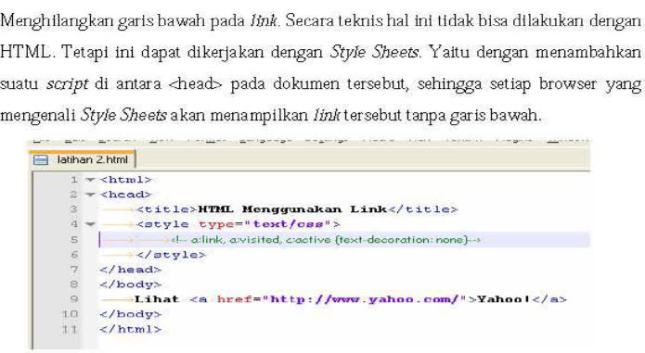
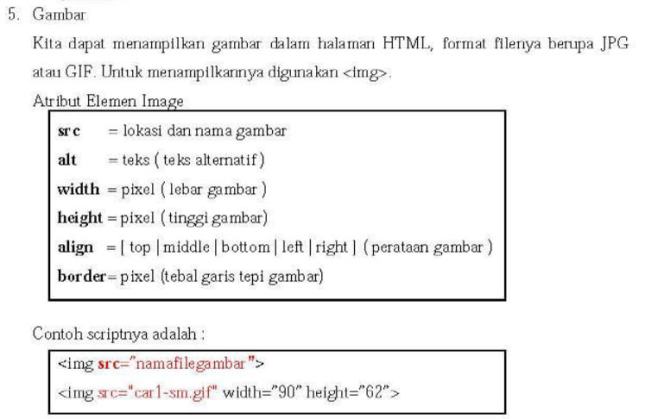
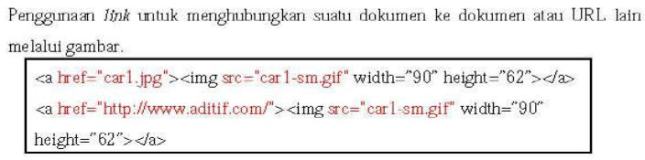
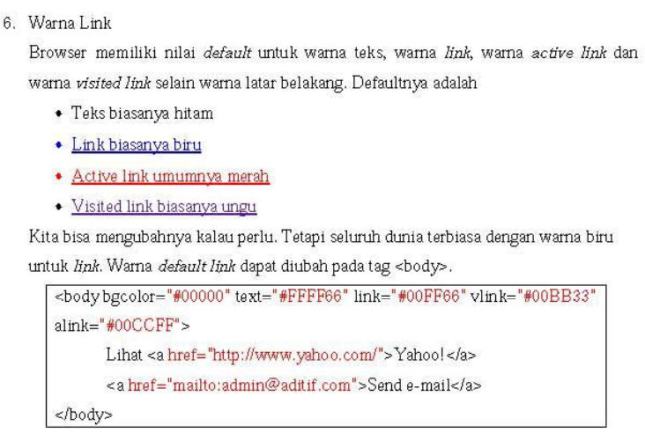
Document body in use to display text, image, and all the links will be displayed on a web page.
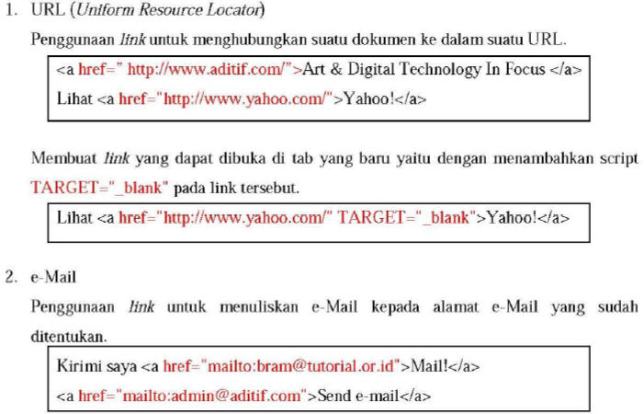
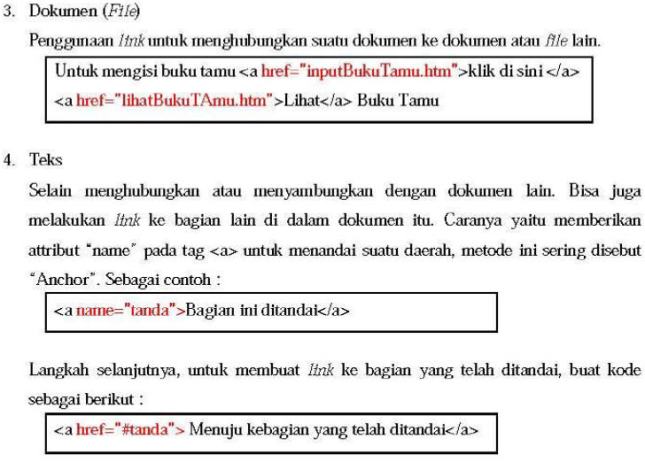
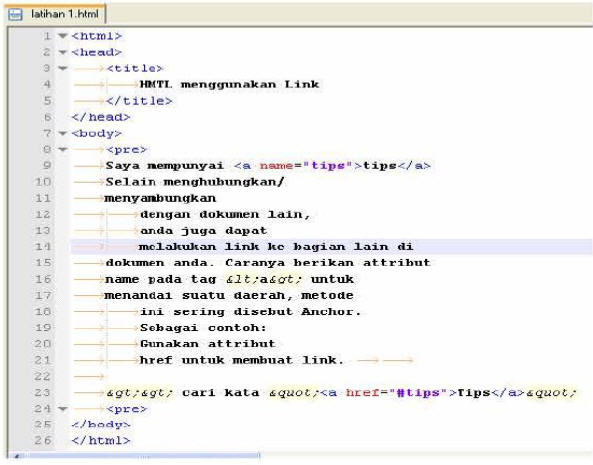
1. TAG links in HTML
N. BASIC HTML ELEMENT
1. Block-Level Element
Block-level element that is often used: Headings (H1 to H6)
Example:
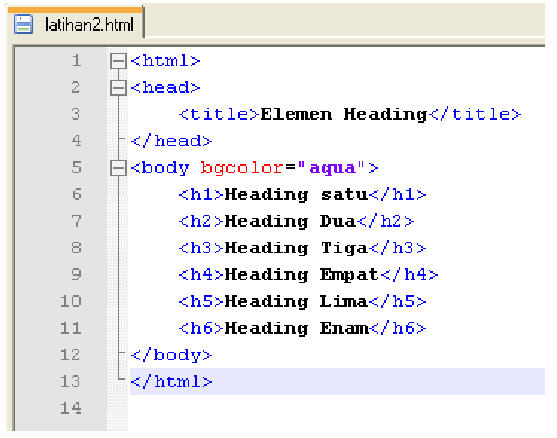
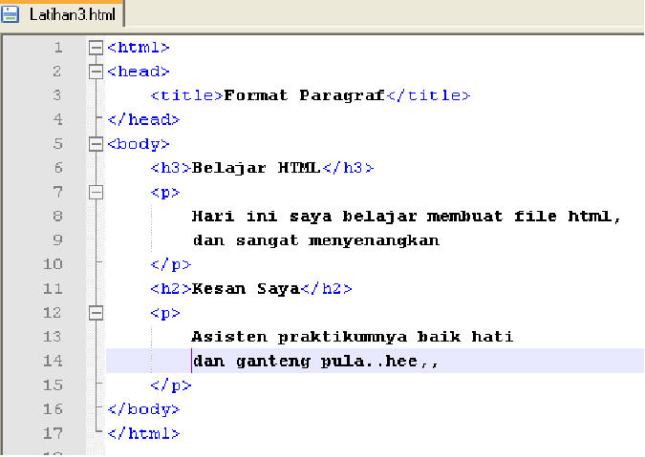
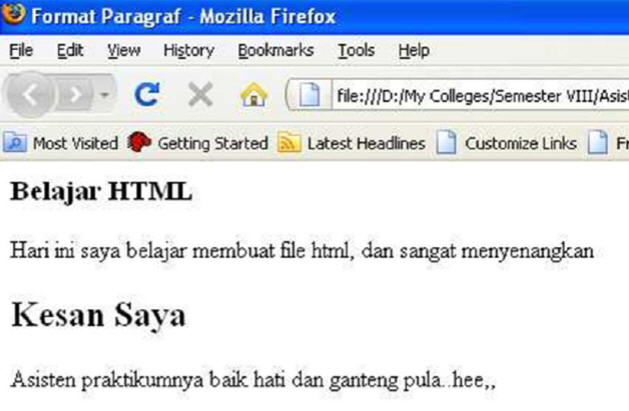
2. Paragraph
(P)
Example:
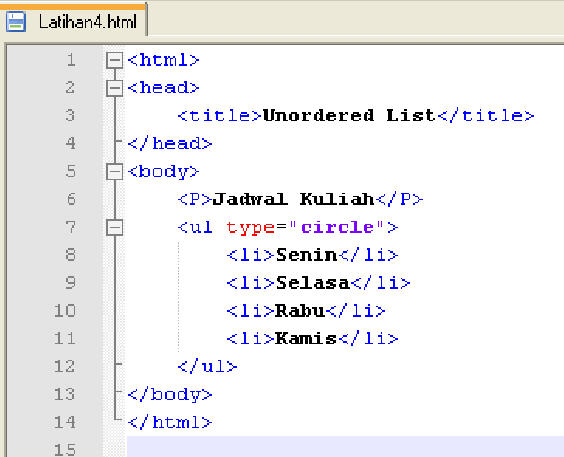
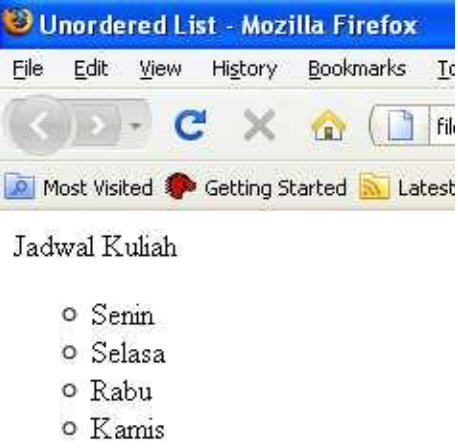
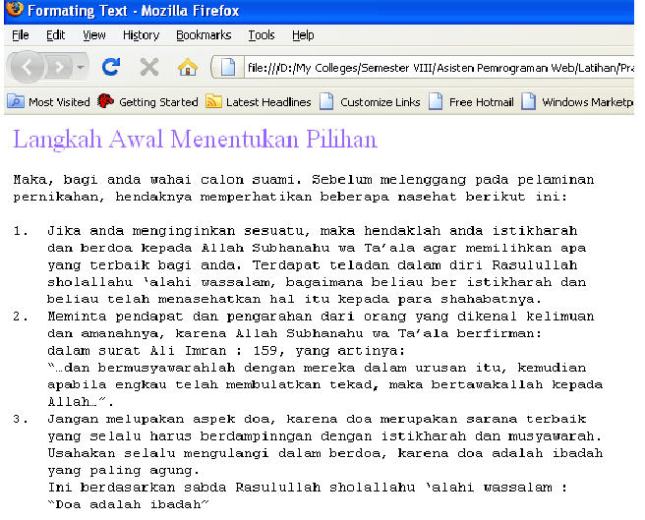
3. List
Item (LI)
List the items in use to segment your data either in sequence (an ordered list) or not in sequence (unordered list).
There are three kinds of lists that you can add to the HTML document:
a. an Unordered List (Bullet):
Tag Attribute Value Description
<ul> type square Bullet Box
disc Bullet Point
Circle Bullet Circle
Example:
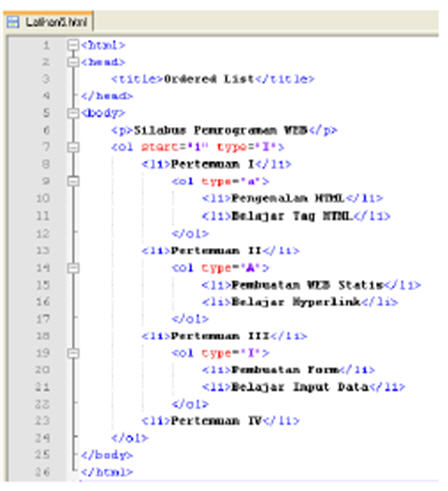
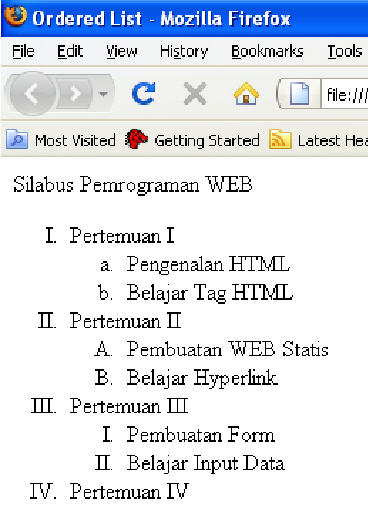
b. an Ordered List (Numbering)
Tag Attribute Value Description
<ol> start n Begin number
type I Upper Roman
i Lower Roman
A Uppercase
a Lowercase
Example:
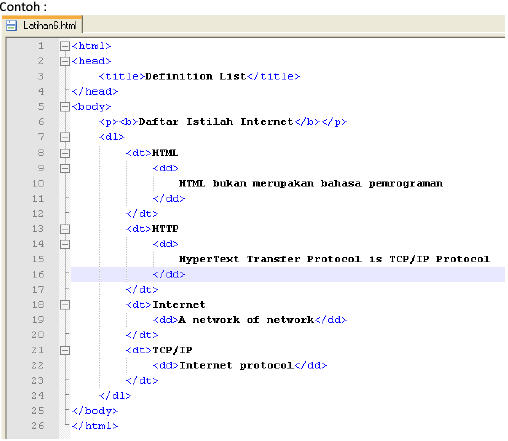
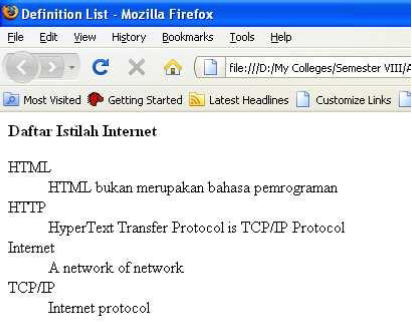
c. Definition List
Definition List is made up by the tag <DL> ... </DL> and <DT> tags specify the definition term and <DD> tags specify the definition itself.
Example:
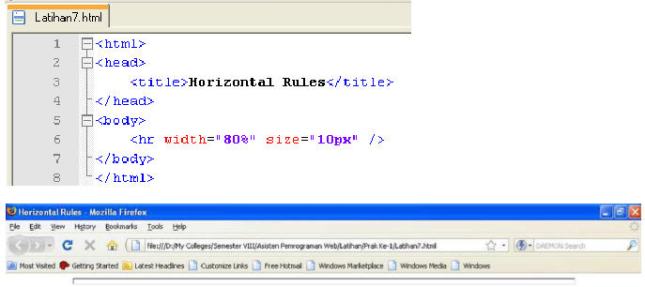
4. Horizontal Rules (HR)
Horizontal Rule tag is used to draw a horizontal line in the HTML document.
Tag Attribute Value Description
<hr> width 100% default
size n px Numbers in pixels
Example:
5. the formatting
Page a. Break
Tag <BR> in use to start a new line in the HTML document, the tags this function is similar to the carriage return.
Example:

b. Fonts
With <FONT> you can specify tag format display font in the document'S HTML like color, size, style and others. Example:
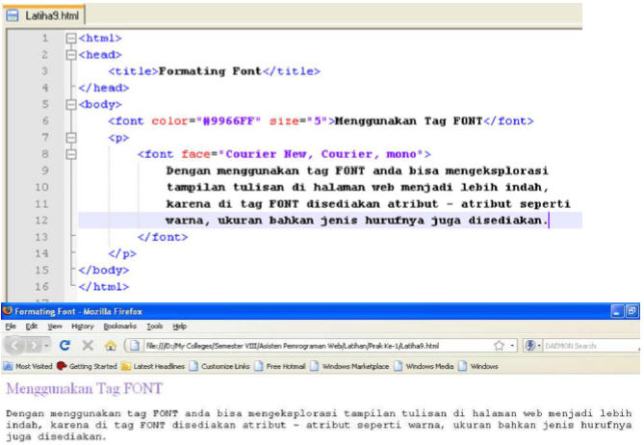 Tag Attribute Value Description
<font>..</font> color Red, yellow etc.
(# 000000-#ffffff)Color bias
using name or hexadecimal Size 1-7 or (n px)Size font faceArial, Times News
RomanType of Font, read start
from the left
c. Color
Color is an attribute that you can add on some element like body, fonts, links and others. Color in the three primary colors that ketegori red, green and blue. Each color is defined in the two-digit hexadecimal number.#RRGG
BB
Datareader Color
#FF0000 Red
#00FF00 Green
#0000FF Blue
# 000000 Black
#FFFFFF White
d. Alignment
Align attribute is used to specify the alignment of the object in HTML document either text, images, objects, paragraphs, division and others.
Value Description
Left Align left
Right Align right
Center Align Middle
Justify Right align left
e. Format text
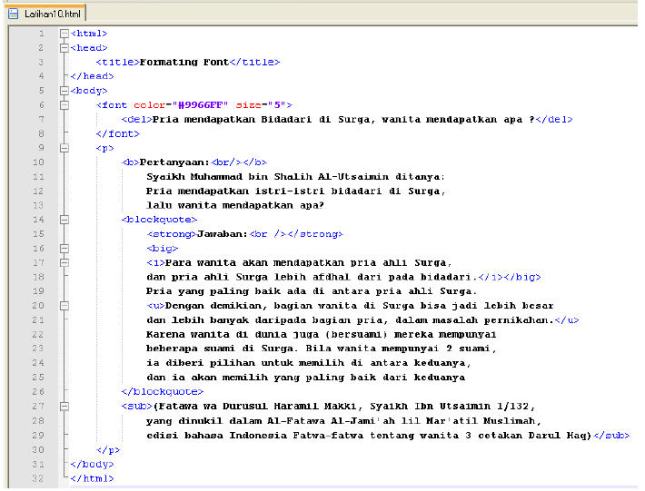
Physical Formatting
Tag Description
<B> ... </B> Bold text
<I> ... </I> Italic text
<U> ... </U> Underline Text
<BIG> ... </BIG> For sizes larger than normal
<SMALL> ... </SMALL> For a size smaller than normal
<STRIKE> ... </STRIKE> To make a line in the middle of text
<SUP> ... </SUP> Superscript text
<SUB> ... </SUB> Subscript text
<CENTER> ... </CENTER> Center document
Logical Formatting
Tag Description
<EM> ... </EM> Text Italic/<I>
<STRONG> ... </STRONG> Text bold/<B>
<DEL> ... </DEL> Write off text/<STRIKE>
<INS> ... </INS> Underline text/<U>
Quotes/Indentation
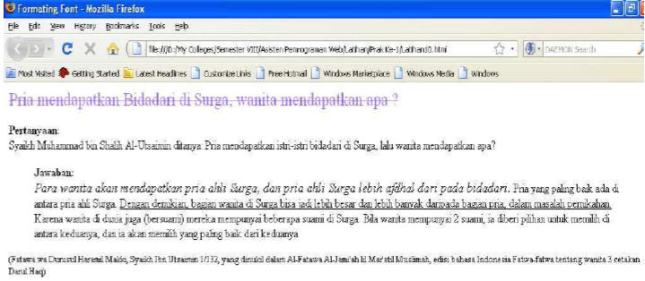
To create indented paragraphs we can use BLOCKQUOTE, for a short indentation you can use the Q element.
Example:
6. Preformatted text
PRE tags in use to display text according to the format of the original.
Example:
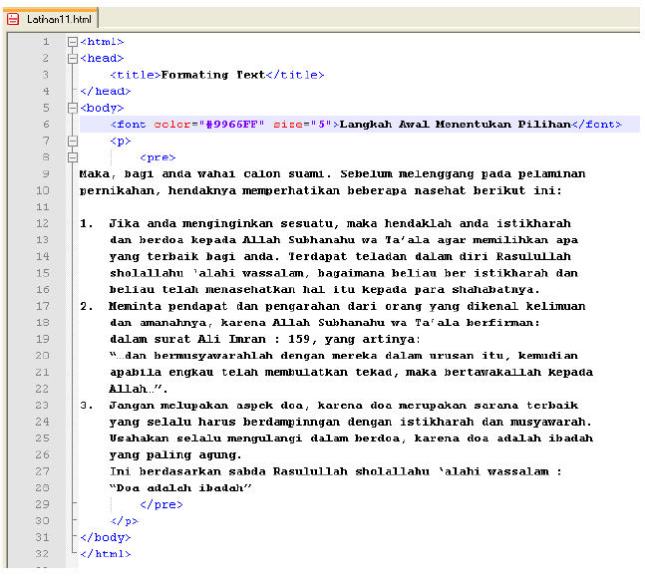
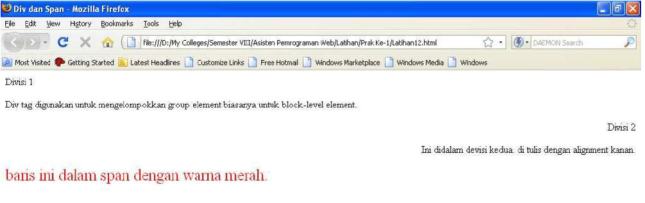
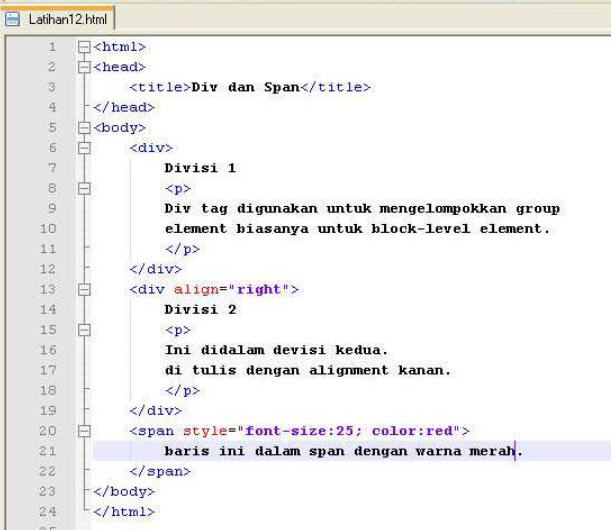
7. Grouping element
The Tag DIV and SPAN in use to classify elementelement HTML. Span is used to define inline content while div is used for block-level content.
Example:
Installing XAMPP on Windows
XAMPP is a package of software that it already adaapache, php, and mysql. Xampp is a perangkatlunak which can be a web server.
How to Install Xampp on Windows
a) Prepare in advance the XAMPP installer, or it can be downloaded at http://www.ApacheFriend.org. then run the installer and double-click on the XAMPP installer file. (In this tutorial use the XAMPP version 1.7.1)
b) Next jendala installation will appear. Click [Next] to continue the installation of XAMPP.
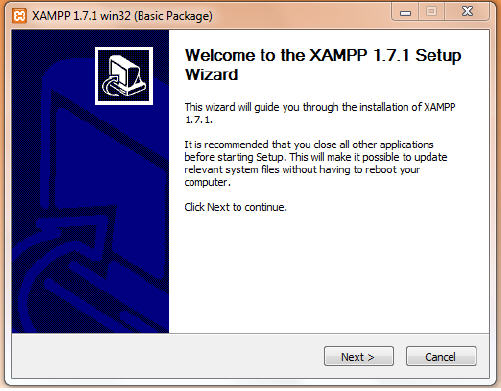
Figure 11. Sign in window installation xammp
c) your next will be asked to choose a location where you want to install XAMPP. The default is terisikan, which is c:\xamppin C:\ partitionin the xamppdirectory. If you want to change the location click [browse].
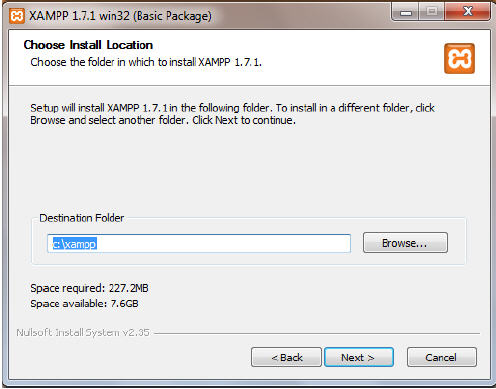
Figure 12. Windows directory folder xampp
d) after selecting the installation location, and then came the installation options. If you are finished selecting options given click [install].
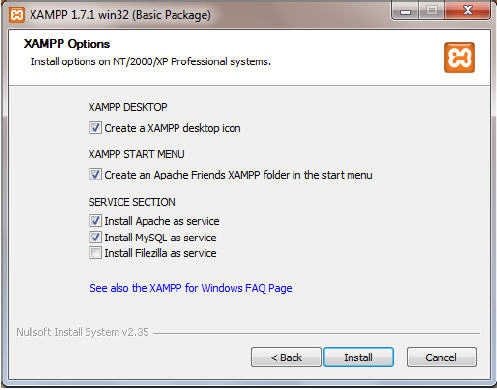
Figure 13. Windows xampp options
Select the first option if you want to create a shortcut on the desktop
Select the second option if you want to create a shortcut in the start menu
the third option checkbox if you want the first time windows burning service Apache directly run
the fourth option check box if you want the first time windows burning service MySQL directly run
the fifth option check box if you want the first time windows burning service direct run Filezilla
e) wait until the installation process is complete.
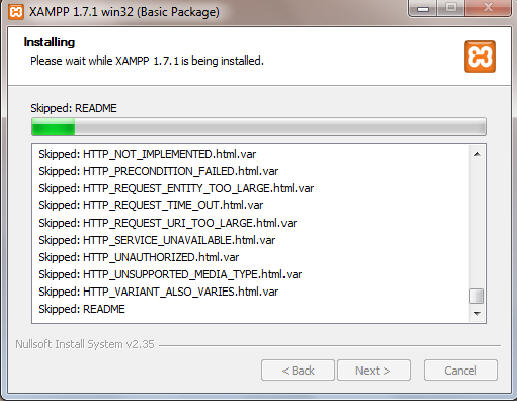
Figure 14. The process of waiting for installation
f) when it is finished click [finish].
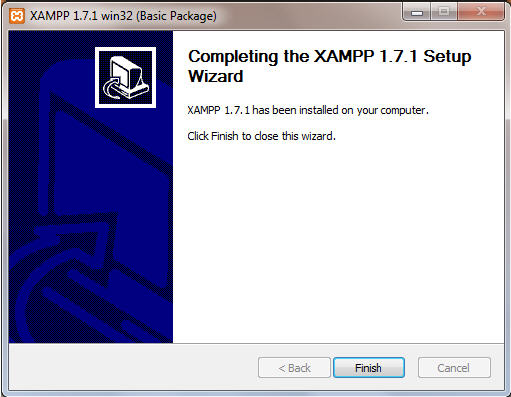
Figure 15. Completing install window
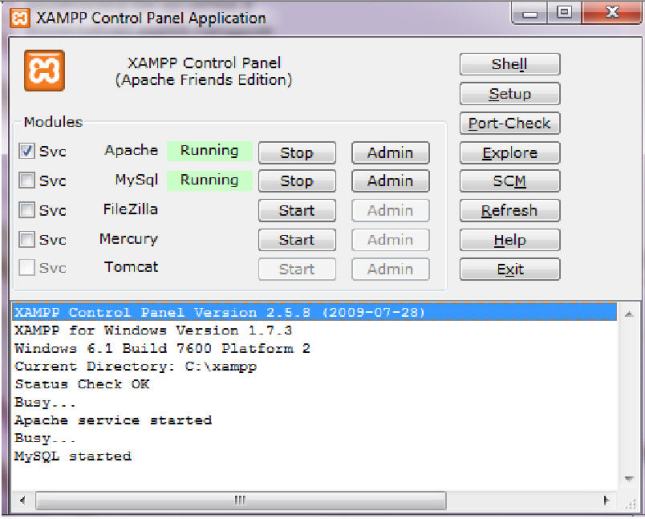
g) run the XAMPP Control panel. Check the Svc on the Apache and MySQL and then click [start]. The result can be seen in the following figure.
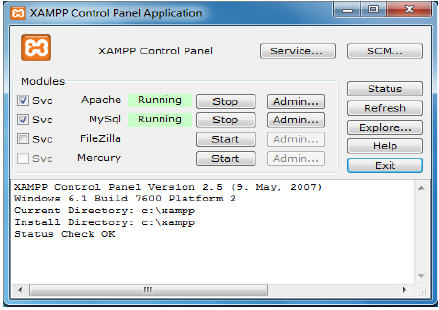
Figure 16. Display of xampp
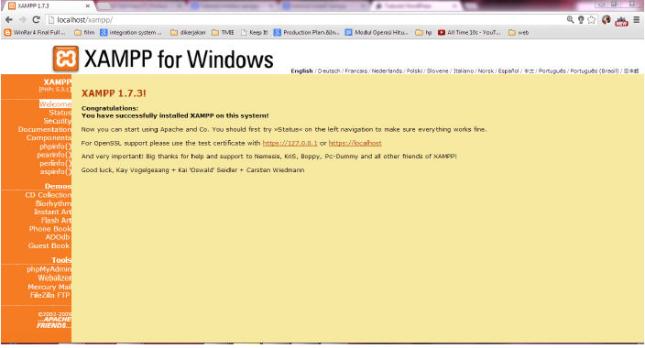
h) to check the result open your browser (Firefox, Chrome, etc) and enter in the URL: http://localhost if successful it will display appears as shown below.

i) Select English, and appeared a page of xampp.
Get to know the CMS (Content Management System)
The content management system(United Kingdom: content management System, or CMS) is a software that allows one to add and/or manipulate (change) the contents of a Website. Generally, a CMS (Content Management System) is composed of two elements:
content management applications (Content Management Application, [CMA])
content delivery application (content delivery application [CDA]).
Element allows the content manager CMA – who may have no knowledge of HTML (HyperText Markup Language), to memenej the manufacture, modification, and
removal of content from a Web site without the need to have skills as a Webmaster.
The CDA element uses and collects information that has been previously added, subtracted or changed by the owner of the web site toupdate or renew Web site. Capabilities or features of a CMS system varies, although most of this software has the features of a Web-based publication, format management, revision control, index, search, and archiving.
CMS software
Drupal
Joomla
WordPress
Plone
Vbulletin
Moodle
Cmsid
RazorCMS
And others.
Utilization Of CMS:
Company's web site, business, organization or community.
Portal
Photo Gallery
E-Commerce Applications.
Manage the personal website/blog.
Web site online learning (e-learning: United Kingdom)
And others.
CMS WordPress installation on Windows
WordPress is an open source application (open source) is a very popular use as a blog engine (blog engine).WordPress is built with the PHP programming language and the database (database) of MySQL. PHP and MySQL, both are open source software (open source software).In addition to the blog, WordPress also began to be used as a CMS (Content Management System) for its ability to be modified and adapted to the needs of its users. WordPress is the official successor of b2/cafelog developed by Michel Valdrighi. The name WordPress was suggested by Christine Selleck, a friend of Chairman of developers (developer), Matt Mullenweg
The following installation steps WordPress CMS on Localhost:
Extract the first package of WordPress CMS module that you have downloaded.
You will find a module that is in a folder that is normally named "wordpress".
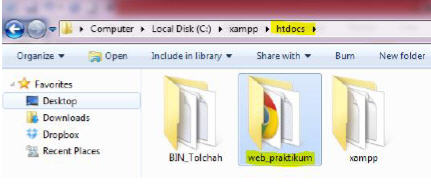
Move the folder WordPress CMS module named "wordpress" into "C:\xampp\htdocs". The main note is storage that has to be done in the "htdocs" folder. No problem you install first XAMPP on drive D, F, or more, the most important of all our web file must be placed in the folder "htdocs". Because when we open the web URL in a browser, the system we use XAMPP localserver will read the htdocs folder and it will search the web is thus presented in a browser. Because the e-book the XAMPP installation guide that you can download from here explained that XAMPP is installed on C:\ path, then we put it in C:\xampp\htdocs.That is why it is so important to our perception.

4. If you are moving or copying pasting the WordPress CMS module, you can rename the folder "wordpress" as you want. So, we will replace with a name such as "web_praktikum".Open your browser, and then type the address "http://localhost/phpmyadmin" in the address bar so that it appears the page phpMyAdmin. We will create a database that will be used by wordpress CMS which we will install. Calm down, we will not deal with the SQL language. Simply write the name of the database that we will use on the box under the words "Create new database". Suppose we give the name "datawebku". Then click on "Create" button on the right.
5. Still in your browser, type in "http://localhost/web_praktikum" also addresses in the address bar. Note that the address depends on the naming of folders you provided in step 4. Because we give the name of the folder is "web_praktikum", the address of the URL is "http://localhost/web_praktikum". However, if you give another name such as "Web", then the address to "http://localhost/webnya". It means that we want displayed on the browser is a web that is in the folder "web_praktikum". Actually we can directly save the entire contents of the wordpress CMS module into the folder "htdocs" without having to put into the folder "web_praktikum", so that the address will be "http://localhost/". Usually this is done if we keep them online and would like to open our web address e.g. http://www.namadomain.com/", not" http://www.namadomain.com/web_praktikum ". However, in order for us to easily manage web-web we create by using localhost, should the web files included into one folder. Moreover, if we want to install or create another web on the localhost, of course we do not want the web-web files mixed and irregular. All our learning management files.
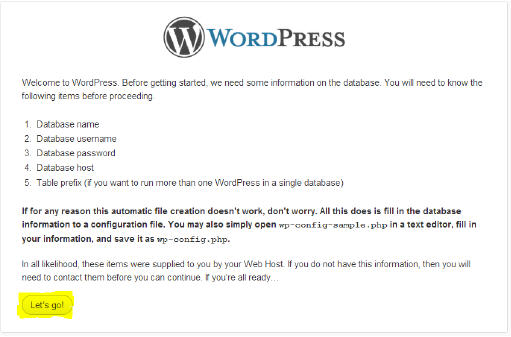
 On your browser will pop up display wordpress error such as the image below because there is a file called wp-mail.php confiq. The File is a file that contains configuration settings for the web WordPress CMS. To create the configuration file, the button reads "lik" Create a Configuration File ".
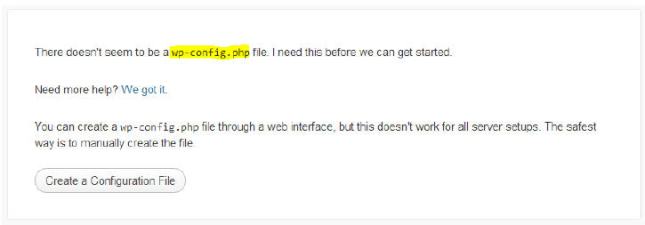
The next page will appear "Setup Configuration File ' like the following. Click the button that says "Let's Go!".
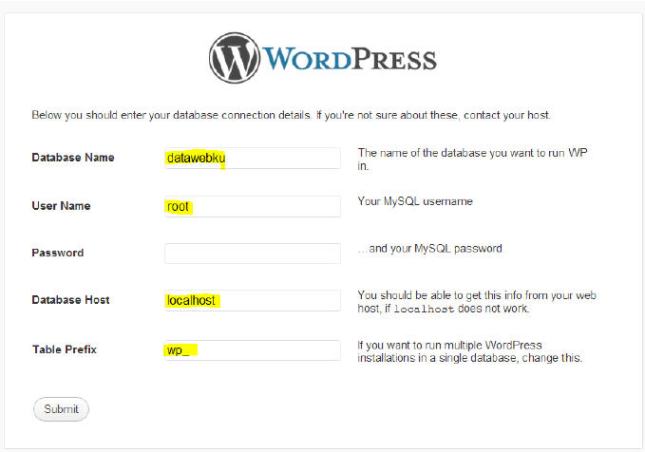
 The next page is the page fields to the configuration settings.
Database Name: enter the name of the database that we created in step 5, which is "datawebku".
User Name: enter a username that have access to enter into phpMyAdmin on the server we use. For the localhost with XAMPP, usually usernamenya is "root".
Password: leave blank.
Database Host: because we save/menghosting our website on localhost, then enter "localhost".
Table Prefix: used to mengunikkan table on database "datawebku". For a while the use default "wp_".
Then click the Submit button.
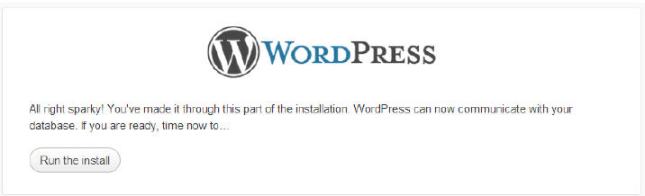
If the settings are correct, it will pop up a page like below. Click the button to Run the install.
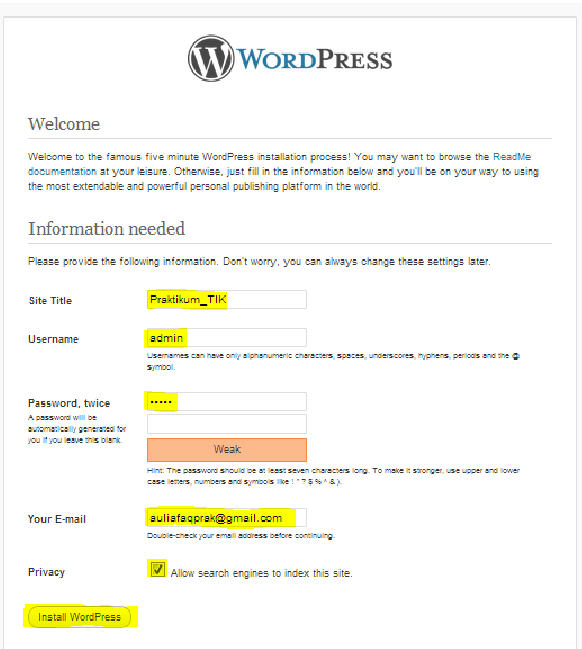
Next you will be asked to fill out information on the web that will you create with WordPress CMS.
Blog Title: enter the title of your website to be visible on the title bar of the browser.
Username: the Username to log into the administrator page later
Password (twice): the Password to get into the administrator page later
Your E-mail: enter your email address (you can fill with any email if you don't have an email address).
Give young checkbox next to "Allow my blog to appear ..." If you want to create a web that you will look on Google and Technorati.
After all it is reasonably correct, click Install WordPress.
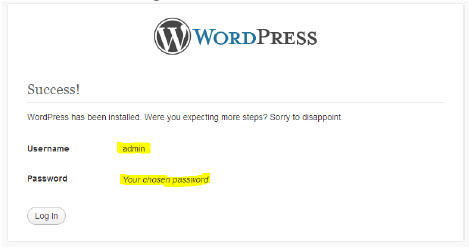
Finally WordPress CMS installation on localhost worked. You'll be shown a username and asked to remember a password that is inputed earlier that you will use to log on to the administrator's page on the wordpress CMS.Then please click the "Log In" to enter the "Log In" to your WordPress Administrator.
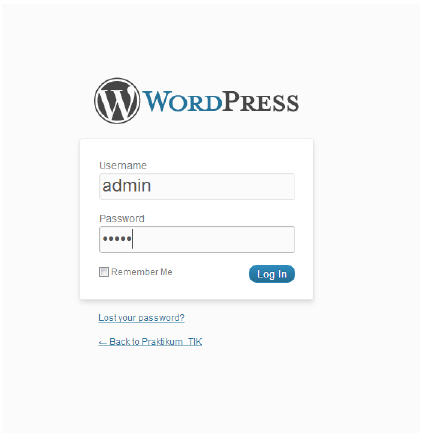
Next we will try to sign in for the first time to the page administrator or for wordpress is usually called "Dashboard" page. If you want to be accessed after this you can access this page by typing in the address "http://localhost/web_praktikum/wp-admin". That address is the address of the web Dashboard page WordPress CMS that you have installed. Enter the appropriate username and password which has been shown in step 12.
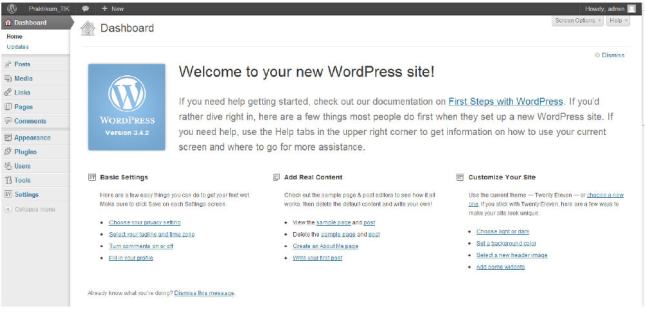
Once logged In you will enter the Admin page or Dashboard, from this page you can edit all of the existing content on the web.
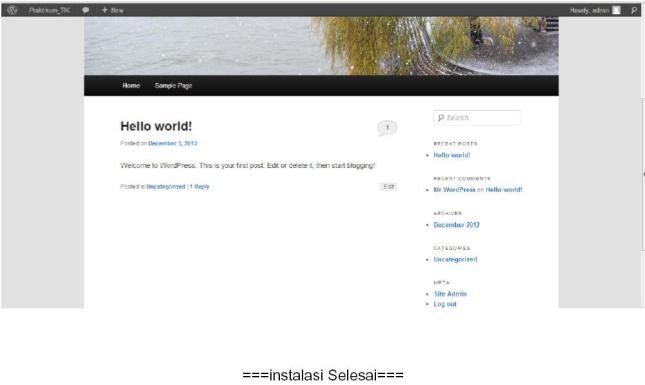
To see the look of wordpress CMS that you have installed, please type in the browser with the address "http://localhost/web_praktikum". And this is the whole web wordpress CMS files. You no longer need to bother making the pages until the sink is placed the script MySQL PHP programming language. With just a few steps, you've got a whole website.
MAKE A POST/Article On WordPress
After installation, come and let us make a posting, but before making postings to dimengrti first the following.
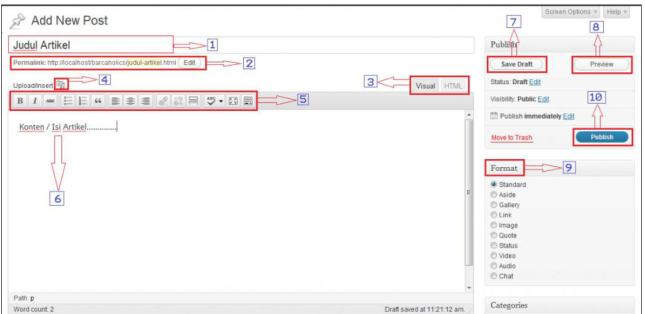
We try to take apart the individual commandments themselves the parts that have been given a Red Box under no sort of the first (No. 1)
1. column to the article title.
2. the Permalink.
A Permalink is a Link to an article that we wrote, when we put the title of the article the title would automatically become links. Yet we are still able to edit the Permalink as you wish or not the same as the article title and edit permalink wordpress here is only for single articles that are being created.
3. Visual | HTML.
When will create articles/postings, there are 2 options Mode (display) on the column content, namely: the Visual and HTML. When using the Visual Mode, then the page should look like the screenshot (image) above.In Visual mode it cannot use the/run the HTML directly, to enter HTML, we can use the Menu Bar found on the No. 5.
4. Upload/Insert.
Click on icon to enter the Media (Images) from your computer, a URL/link a
website, Gallery, Media library.
5. the Menu Bar.
WordPress provides several features that allow us to make more posts
that is interesting. Look at the picture and the explanation given by the numbers
listed.
 The features that wordpress provide to add images, audio or video into the post. Remember the location of the mouse pointer determines the location where the media is inserted in the post.
The writing-Mode. The visual Mode is useful for those of us who don't understand html. And I will tell you this time is the visual mode.
Thick paper (bold). ex: This is bold
Create italics. ex: This is italics
Make writing crossed out. ex: this streak
Adds bullets at the beginning of each paragraph.
7. Add number.
Blockquote, a kind of quote.
ex. I was blockqoute
The reply that this would've know, align left, Align Center, and align right for paragraphs.
Create a link. Do I live blocks a sentence or Word to be made a link and then press this button and input the destination address.
ex: it's links
The opposite of number 10, make a link into the text.
That is to restrict the posting will be displayed on the index page of blog/homepage so that at the end of the posting will appear the words read more.
The use of the language used. Because there is no language of Indonesia so let alone.
Full Screen Mode. So better make rumahkayubekas, please use this mode.
Kitchen Sink, click this button it will pop up a few additional features below.
Kitchen Sink
Kitchen Sink kind of additional tools that might be needed to ease or embellish our posts. The following images and some information,
 Some of the formatting that can be selected,
the format is the standard format.
Paragraph, to format paragraphs.
Address to an address.
ex: this is an address.
Preformatted, I normally use to insert code into the post.
ex:
<html>
<head>
<title>prefromatted</title>
</head>
<body>
This html is not read as html,
only be shown only
</body>
</html>
Heading, usually used in the title and subjudulnya.
heading 1
heading 2
heading 3
heading 4
Make text underlined in the line, ex: text underlined
Justify paragraph, leveling of left and right.
Coloring text, ex: this text color.
Makes it easy to copy and paste text from notepad.
Same as no. 5, only this time from microsoft office word. This is very useful for bloggers who are not yet familiar with the wordpress posting tools. Just create more posts in ms word and then copy and paste with this button. All formats will match the look in Ms. word, unless the image has to be entered manually.
Well, I don't know what to use. Anybody want to add?
Add embedded media with a wide range of extensions.
Add a custom character, ex:..ã©®½²..
Add indent and outdent, such as function keys tab in ms word.
Undo and redo.
Help. Contains additional explanations that might help.
6. The Content of the article.
7. Save Draft.
Keep the article is not yet ready for Publish.
8. Preview.
Article preview before Publish.
9. Format.
Set the display of the Post on the main page/home, choosing this format also depends
of the Theme in use.
10. Publish.
The last step you will do when your article is ready to publish.
How To Post An Article On WordPress
Here are the steps to post articles on wordpress:
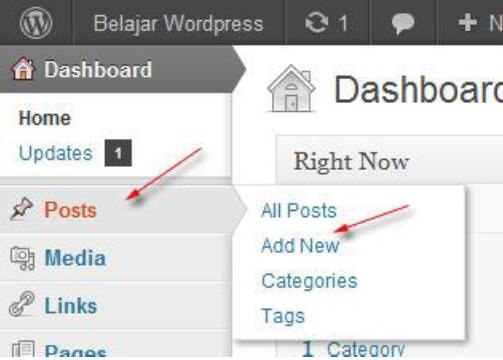
Diverting attention to the left side of the menu, highlight Messages and then select Add New
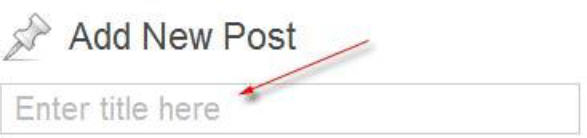
Enter the article title in the form Enter Title here
After a few moments, it will appear the permalink. The Permalink is the address that will be created after an article is published, the permalink you can change/edit according to desire when you want it. Click the edit button and enter the address you want, simply by keyword only because later will automatically change. Or it could be through widgets slug that is in the bottom of the post editor. However, this is optional, if you do not want to change it then leave alone for what it is.

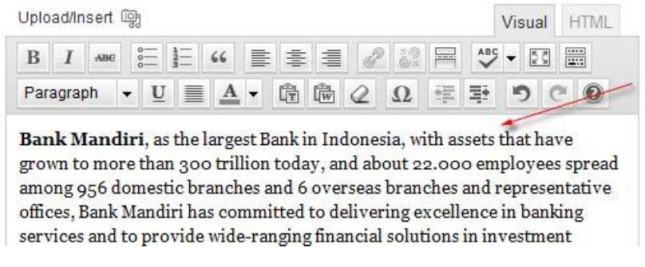
Write articles that you want to publish the form post editing area. Please edit as you wish you, please read the article about visual post editor if you do not so understand the tool can be used.
If the article is going to the group, select the appropriate category on the categories widget, or you can create a new category.
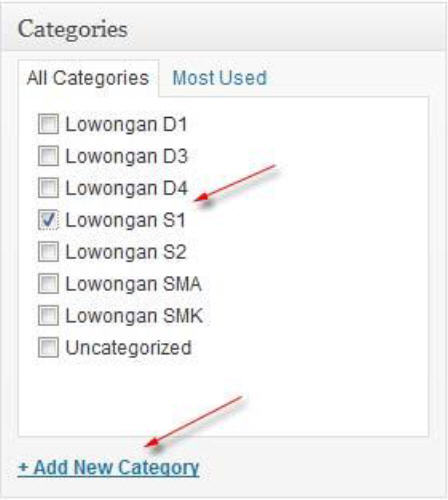
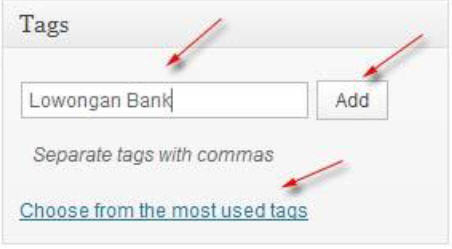
If you want to have a tag, please enter a new tag or select from an existing tag, however this is not mandatory or optional sipatnya (same tag functions by category).
7. Perhartikan is also widget-widget Excerp, Send Trackbacks, Custom create 99 fileds, Discussion as well as the Author, you may want to fill or change it.Make it a habit to see a Preview before you really are sure to publish the article. Preview your article before it is actually published, just click the Preview button to do so.When you are absolutely sure the article you want to publish, click Publish.

* Finished.
How to replace Theme on WordPress Offline
The following steps change the theme on the wordpress offline:
Download WordPress Theme
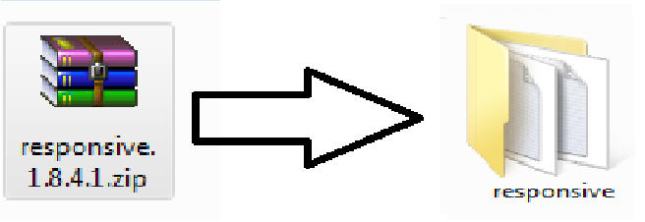
Please first download your favorite wordpress theme, but as an example of kang Loveland will useresponsive. 1.8.4.1.
Files that we've got here is still in the form of a zip file, therefore ekstraklah first file using software such as winzip or winrar Extractor, or online at dihttp://wobzip.org.
 Please run the Windows explorer and open the directory C:\xampp\htdocs\wordpress\wpcontent\ themes (remember that you previously have installed Xampp), copy and paste the folder themesresponsive to the directory.
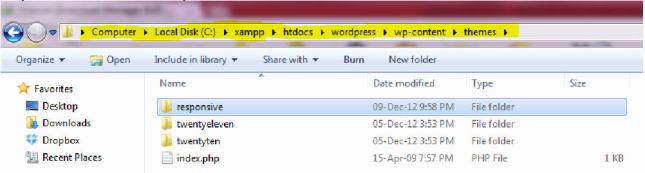
Activate The Theme
Please run the Xampp Control Center, simply "Start Apache and MySql.
 Open your internet browser, and then type http://localhost/wordpress/ in the address bar, and display the local blog you will like this:
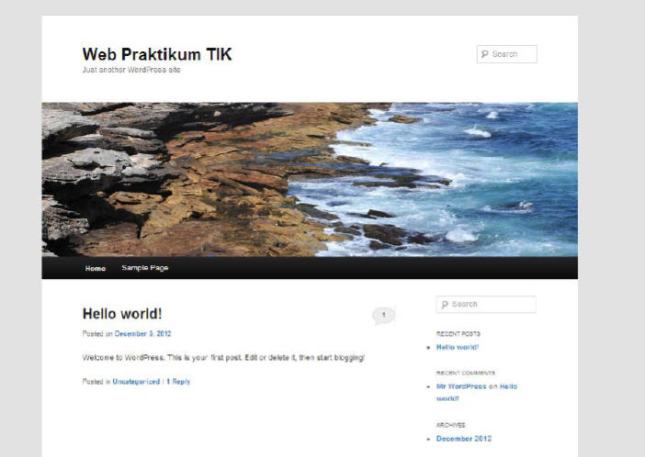 Click Log in to log into your local blog or directly entering http://localhost/wordpress/wp-login.php in the address bar, then please login with your username and password.
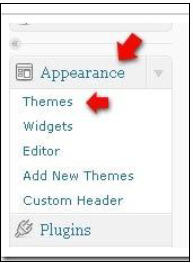
After being in the dashboard of the blog, click the Appearance menu (on the left), then click the Themes.
 Click on the Active theme "responsive 1.8.4.1.". To see the results, please click the "Visit Site" is in the upper left, and should it be like this:
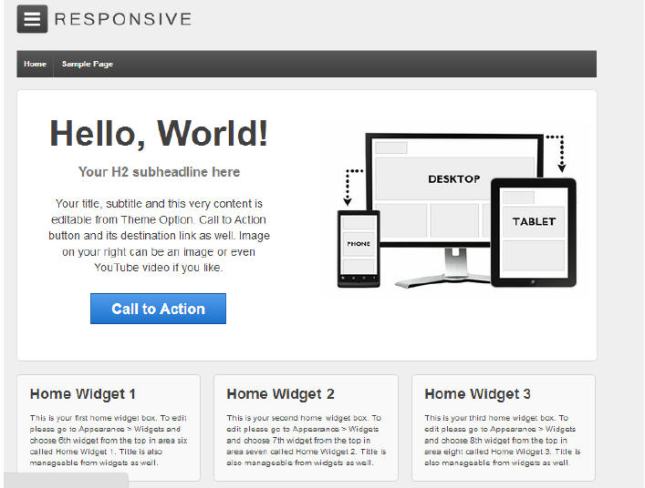
•Complete.
In a way, surely you can do testing of the theme to the next can be uploaded to a webhost if proven compatible.In addition you can edit the theme's fill your heart without having to fear the damage arises because it is still not yet online and dikomputer on the internet.
How to change wordpress theme from admin page
The steps how to change wordpress theme from admin page.
One of the things from the wordpress settings most often entirely different surfaces is a wordpress theme.Worked at a theme, not good in the eyes of Google or another search engine. So if you want to change the theme, if you can do it often – often.
There are 4 ways to replace wordpress theme:
How to change wordpress theme from wordpress admin page by way of file uploading themes in zip format.
How to change wordpress theme from wordpress admin page by search and select the theme that is provided in the wordpress theme.
The 3rd way, change theme wordpress via FTP. Using FTP software filezilla client, or another FTP software.Change wordpress theme via FTP is not much different from how to install wordpress using FTP client. That is just drag the files into the wordpress theme folder to wp-content/themes.
The fourth way, we can change wordpress theme through the file manager feature in Cpanel hosting us. But here we will learn how to change wordpress theme from admin page or dashboard of wordpress.
First, How to replace theme from wordpress admin page with how to upload files wordpress theme. This method only applies to wordpress with my own hosting. Please refer to the following steps:
Prepare your wordpress theme Files, usually in the form of a zip file. Don't you need to extract.
Let it be in the form of Zip.
Please login to the wordpress admin page.
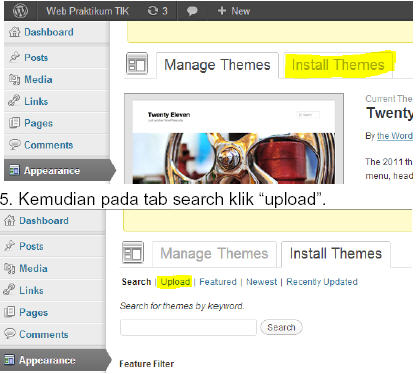
Select the "Appearance" menu on the left side, click "Themes" submenu.
Select the tab "Install theme":
6. a. Then click the button "select" search zip file that we have theme history
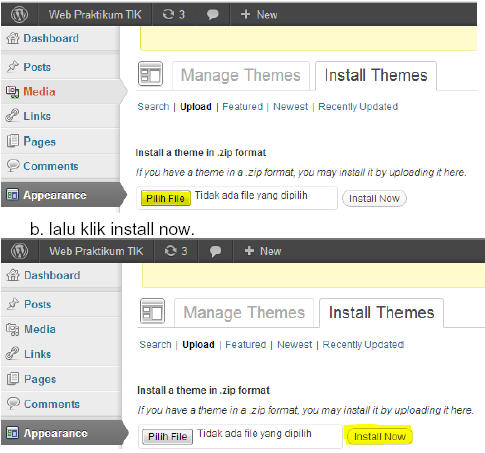
7. After the installation process is successful. Click "Activate".
Second, How to replace theme from wordpress admin page with search and then select the theme provided by wordpress theme page. How this can be done in wordpress with hosting and wordpress dot com. The explanation below:
Still in the same page (wordpress admin theme page), select the tab to install themes, and then click search.After performing all the options theme there, we just choose-pilihtheme where the preferred foods or in accordance with our wordpress blog theme. Then tinggalaktifkan.


0 komentar:
Posting Komentar